How To Grow Weed, Growing weed, or cannabis, at home can be a rewarding and educational experience, allowing you to control the quality of your harvest and explore the world of cultivation. Whether you’re a complete beginner or someone looking to refine your skills, this guide will walk you through the essential steps on how to grow weed effectively and safely.
1. Understand the Legal Framework
Before diving into cultivation, it’s crucial to check your local laws. Cannabis cultivation is legal in some regions, but highly restricted or illegal in others. Ensure that you’re following the legal guidelines in your area to avoid legal complications.
2. Choose the Right Strain
Selecting the right cannabis strain is the first critical step in your cultivation journey. Cannabis strains are typically classified into three categories: Indica, Sativa, and Hybrid.
- Indica strains are known for their calming effects and are typically shorter and bushier, making them easier to grow indoors.
- Sativa strains tend to have uplifting effects but can grow taller, making them more suitable for outdoor growing.
- Hybrid strains offer a mix of both effects and characteristics.
Research strains based on your desired effects and growing conditions.
3. Select the Growing Medium
Cannabis can be grown in various mediums, including soil, coco coir, and hydroponics.
- Soil is the most beginner-friendly option and is widely available. Organic soil with the right nutrients is essential for optimal growth.
- Coco coir is a soilless medium made from coconut husks, offering more control over nutrients but requiring more frequent watering.
- Hydroponics involves growing cannabis in water mixed with nutrients, allowing for faster growth but requiring more expertise and monitoring.
4. Set Up the Growing Environment
Your cannabis plants will need a controlled environment to thrive, especially if growing indoors. The key factors to consider are:
- Light: Cannabis plants need light to grow, and the amount of light they receive directly affects their growth and yield. You can use different types of lights, such as LEDs, HID (High-Intensity Discharge), or CFLs (Compact Fluorescent Lamps). LEDs are the most energy-efficient and offer full-spectrum light, making them ideal for all stages of growth.
- Temperature and Humidity: Cannabis plants prefer temperatures between 70-85°F (20-30°C) during the day and slightly cooler at night. Humidity levels should be kept between 40-60% to avoid mold and mildew. Use fans, humidifiers, and heaters to maintain optimal conditions.
- Ventilation: Proper airflow is crucial to prevent mold, pests, and nutrient buildup. Use fans and exhaust systems to ensure fresh air circulates in your grow space.
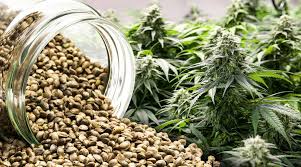
5. Germinate Your Seeds
Germination is the process of getting your cannabis seeds to sprout. The most common method involves placing seeds between damp paper towels, keeping them warm and moist until they crack open and show their taproots. This usually takes 24-72 hours.
Once your seeds have sprouted, they can be planted into your growing medium.
6. The Growing Stages
Cannabis plants go through several stages of growth, and understanding these stages is crucial for providing the right care at the right time.
- Seedling Stage (1-3 weeks): After germination, the seedling stage begins. During this time, the plant focuses on growing its roots and small leaves. Keep the environment warm and humid with gentle light.
- Vegetative Stage (3-8 weeks): This is when the plant experiences the most growth. Increase the light intensity and ensure the plant has enough nutrients (especially nitrogen). Your plant will develop stems, leaves, and branches.
- Flowering Stage (6-12 weeks): In this stage, cannabis plants start developing buds. Reduce the light cycle to 12 hours of light and 12 hours of darkness daily. Your plants will now need more phosphorus and potassium, so adjust nutrients accordingly.
7. Feeding and Watering
Cannabis plants require specific nutrients at different stages of growth. The primary nutrients are nitrogen (N), phosphorus (P), and potassium (K), often referred to as NPK. During the vegetative stage, cannabis needs more nitrogen, while during the flowering stage, it requires more phosphorus and potassium.
Overfeeding can cause nutrient burn, while underfeeding can stunt growth. Pay attention to your plants’ leaves for signs of nutrient deficiencies or excesses, and adjust your feeding schedule accordingly.
Watering should be done when the top inch of the soil feels dry. Avoid overwatering, as cannabis roots need oxygen to thrive.
8. Pruning and Training
Pruning and training your cannabis plants can increase yields and improve the overall health of the plant.
- Topping and Fimming: These techniques involve cutting the tops of plants to encourage more lateral growth, leading to bushier plants with more bud sites.
- Low-Stress Training (LST): This involves gently bending and tying down branches to create a more even canopy, ensuring all parts of the plant receive equal light exposure.
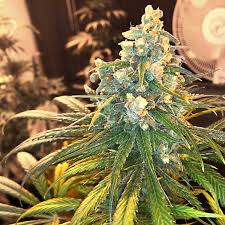
9. Harvesting
Knowing when to harvest is crucial for maximizing potency and yield. Harvest too early, and the effects might be underwhelming; harvest too late, and the potency could diminish.
The best way to tell if your cannabis is ready for harvest is by checking the trichomes (tiny, crystal-like structures on the buds). Use a magnifying glass or jeweler’s loupe to inspect them:
- Clear trichomes indicate the plant isn’t ready.
- Cloudy/milky trichomes suggest peak potency.
- Amber trichomes indicate the plant is overripe, resulting in a more sedative effect.
Once you’ve decided to harvest, cut the branches, trim off the fan leaves, and hang them upside down to dry in a dark, cool space with good airflow.
10. Drying and Curing
Drying and curing are essential steps to ensure your cannabis is smooth, flavorful, and potent.
- Drying: Hang the harvested branches in a room with 50-60% humidity and a temperature of 60-70°F (15-21°C). Drying usually takes 7-10 days.
- Curing: Once the buds feel dry on the outside, place them in glass jars and store them in a cool, dark place. Open the jars daily for the first week to allow moisture to escape (this is known as “burping”). Proper curing can take 2-4 weeks, but longer cures can improve the quality even more.
11. Troubleshooting Common Problems
New growers often encounter issues such as pests, mold, or nutrient deficiencies. To avoid these, regularly inspect your plants for any signs of trouble, maintain a clean growing environment, and follow the correct feeding schedule.
Conclusion
Learning how to grow weed is both a science and an art. It requires patience, attention to detail, and a willingness to learn from mistakes. By following this guide, you’ll be well on your way to growing your own high-quality cannabis at home. Whether you’re doing it for personal use or as a hobby, the process can be immensely satisfying when done right. Happy growing!
You Might Also Like These:
